

















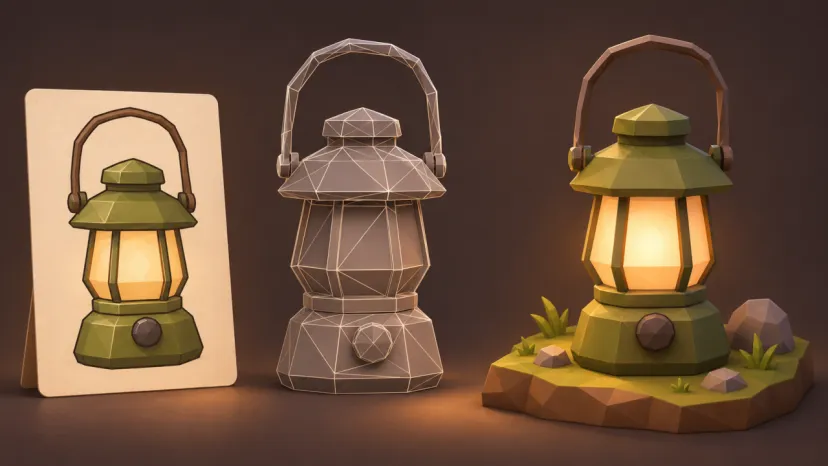

A distinctive prop can make a small game scene feel more deliberate, but building every object from scratch takes time away from the rest of a project. N4D supports an image-based route to a starting 3D model, followed by mesh refinement. For a hobby developer or creator assembling a scene, the useful goal is an object that keeps its recognizable shape while carrying only the detail the scene needs.
An image to low poly 3D model workflow connects those two tasks: establish the form from a reference, then simplify and inspect the mesh for its intended use. Low polygon count alone does not make an asset efficient or visually effective. The camera distance, materials, and number of copies in the scene all affect the final result.
Choose a prop with a readable silhouette
Start with an object whose identity is clear from its outline. A camping lantern, a small crate, or a stylized sign provides a manageable first project. Thin chains, tangled cables, and overlapping transparent parts make the reference harder to interpret and the resulting model harder to simplify.
For this workflow, imagine an original lantern with a broad base, a tapered body, and a curved handle. Its shape should still be recognizable when viewed as a small object in a game scene. Decide which features are essential before generating anything: the handle opening matters more than a tiny screw that the player will never see.
Use your own drawing or an image you have permission to use. Keep the whole object visible against a plain background. A three-quarter view can help explain depth, while clear separation around the handle makes its opening easier to read.
Generate the basic form before reducing detail
Upload the reference to N4D’s Image to 3D workflow and create a starting model. Inspect that model before treating polygon reduction as the next automatic step. If the lantern’s handle is closed or the body has an unwanted bulge, reducing the mesh will preserve a version of the wrong form.
Rotate the model and compare the front, sides, rear, and underside. A single reference leaves hidden areas open to interpretation. Decide whether those interpretations suit a decorative game prop. A model generated from an image should not be treated as a measured scan of the original object.
Keep a copy of the selected starting mesh. It gives you a reference for later comparisons and a way to try a different reduction without losing the version that held the most detail.
Reduce geometry around the intended view
When you are ready to simplify, open the generated model’s details and find Remesh in the bottom action bar. This operation currently accepts models with triangle topology; a source model that already uses quad topology is not eligible. Choose among the available topology and face-count controls, then compare the new result with the original. Generation and remeshing use different face-count ranges, so check the controls for the operation you are using.
Avoid choosing the smallest available mesh simply because it is the smallest. Inspect where the silhouette changes. A lantern’s curved handle may become visibly angular before its broad base needs further simplification. The right balance depends on how close the camera will get.
If the model still needs local edits, a 3D editor can help refine a specific connection or remove unnecessary detail. Keep changes tied to an observed problem. An evenly distributed mesh is not automatically the best use of geometry when some edges define the silhouette and others sit on broad, flat surfaces.
Review shading and materials separately
Low-poly can describe a reduced mesh or an intentionally faceted visual style. Decide which result you want. A faceted lantern might suit a stylized campsite, while a smoother appearance may better match a scene with realistic furniture and terrain.
Inspect the model with a plain material to see how the geometry and surface shading behave. Then restore the intended textures and check whether important details remain visible. Texture detail cannot restore a missing hole or change the outline of the handle.
Consider material complexity alongside the mesh. Large textures and multiple material assignments can still make a small prop expensive to use. Keep only the surface detail that contributes at the intended viewing distance, and check the imported materials instead of assuming every part of the preview will transfer unchanged.
Export and test the prop in a real scene
Choose an export format supported by both the current workflow and your destination application. Import the asset into a clean test scene first. Establish its scale, orientation, and position on the ground before adding it to a larger level.
Test it under the lighting and camera conditions that matter. Place it at the expected distance, then inspect it more closely for distracting defects. If the game needs several lanterns, test several copies rather than judging the cost of only one isolated object.
Use the destination application’s profiling tools when performance matters. Reducing polygons can help a project, but the actual effect depends on the wider scene. Materials, textures, lighting, and other assets contribute too, so a face count cannot support a promised frame rate on its own.
Save a version that others can use
Keep the reference image, selected base mesh, reduced version, and final export together. Add a short note with the intended scale, application, and any remaining edits. Reopen the exported file from that folder to confirm that the handoff contains what it needs.
This makes N4D useful as part of a repeatable prop workflow: begin with a readable image, inspect the generated form, simplify with a purpose, and judge the result in the scene where it will actually be used. The finished asset should earn its place through its appearance and behavior there.
Like our Facebook Page here at NasiLemakTech.com for more news and in-depth reviews! Also, join our Facebook Group for insightful information and memes!
Subscribe to our YouTube channel too!